How to create your local own server using java
| import java.io.*; | |
| import java.net.ServerSocket; | |
| import java.net.Socket; | |
| import java.util.Scanner; | |
| /** | |
| * Written by Martin Ombura Jr. <@martinomburajr> | |
| */ | |
| public class MyServer { | |
| public static void main(String[] args) { | |
| connectToServer(); | |
| } | |
| public static void connectToServer() { | |
| //Try connect to the server on an unused port eg 9991. A successful connection will return a socket | |
| try(ServerSocket serverSocket = new ServerSocket(9991)) { | |
| Socket connectionSocket = serverSocket.accept(); | |
| //Create Input&Outputstreams for the connection | |
| InputStream inputToServer = connectionSocket.getInputStream(); | |
| OutputStream outputFromServer = connectionSocket.getOutputStream(); | |
| Scanner scanner = new Scanner(inputToServer, "UTF-8"); | |
| PrintWriter serverPrintOut = new PrintWriter(new OutputStreamWriter(outputFromServer, "UTF-8"), true); | |
| serverPrintOut.println("Hello World! Enter Peace to exit."); | |
| //Have the server take input from the client and echo it back | |
| //This should be placed in a loop that listens for a terminator text e.g. bye | |
| boolean done = false; | |
| while(!done && scanner.hasNextLine()) { | |
| String line = scanner.nextLine(); | |
| serverPrintOut.println("Echo from <Your Name Here> Server: " + line); | |
| if(line.toLowerCase().trim().equals("peace")) { | |
| done = true; | |
| } | |
| } | |
| } catch (IOException e) { | |
| e.printStackTrace(); | |
| } | |
| } | |
| }
The code is taken from github
Working !!
In EC-1, we create a method
connectToServer, in this method we have an incomplete-try statement that does the following: 1. Creates a ServerSocket 2. Specifies the port 9991 that this service will run on 3. Accepts the ServerSocket connection!
and Shazam! We have created our connection, well atleas the foundations of the connection. We haven’t connected to anything just yet. In Java, a
ServerSocket simply waits on a connection, once connected, receives some arbitrary input, processes that input, then spits back a response! In our case our server will just echo out whatever you choose to type into it! As per the definition of the ServerSocket, it needs to wait on a connection, in EC-1 the last line accepts that connection and we save that in a variable called connectionSocket that is of type Socket
In EC-2, we create an
InputStream that takes an input from connectionSocket created above, and we also create OutputStreamthat gets the output from the connectionSocket . The input stream represents what we shall be sending to the server, so it is the inputToServer, whereas the output represents the output from server.
In EC-3 we take the
IOStreams created in EC-2, and use them. We first create a Scanner, the scanner will take in the input to the server and transform it to a form the server can read. We then create a PrintWriter, the PrintWriter will take the output from the server and print it on our screens. Creating both the Scanner and PrintWriter is essential because the IOStreams alone in EC-2 just represent data in transit, they do not print or convert the data into format the server and user understands. In order for us to see that we have connected to the server, the server should inform us by printing Hello! to us upon connection.
To recap, we can now connect to our server (EC-1), send and receive information from the server thanks to
IOStreams (EC-2) and can translate
In EC-4, we need a way to check if the client is done with the connection. We start by creating a
boolean flag called done and set it to false. We then create a while loop that eagerly observes if the done value changes to true, it also checks to see that the Scanner created in EC-3 is still functioning properly and can accept input.
The role of our server is to print back whatever we type to it, the
Scannerclass checks if there is a new line sent by the user and we use that input as output for the server, prefixed with “Echo from <Your Name Here> Server: ”.
Lastly we need to find a way to actually terminate the connection upon client request. So if the client types the word “peace”, the code will change the done flag to true, and the while-loop condition will no longer be satisfied and it will terminate the loop and the application.
Connect to the Server!
It’s time to put all our work and run this code.
1 How to Connect
2. In order for you to connect to the server you need a tool that can allow you to do this. On Linux & Mac, feel free to use
netcat or telnet or any other connection protocol you would like, if you do not have them google search how to install them on your OS version. For windows, there are several tools as well like winrs. The commands would be as follows
NetCat: This is a popular networking utility for connecting to websites, servers etc.
nc 127.0.0.1 9991
Telnet: Telnet is an old bi-directional internet connection protocol. It is very simple and will send data across a connection unencrypted. This means you should avoid using it when passing sensitive information. But for this simple example it works.
telnet 127.0.0.1 9991
Curl: Curl is a bit different, than the two above as it will connect to the server in a web-page format. The disadvantage of this is that it may not be easy to send text directly to curl once connected, therefore you terminating the connection cannot be done by typing in “bye”.
curl 127.0.0.1:9991
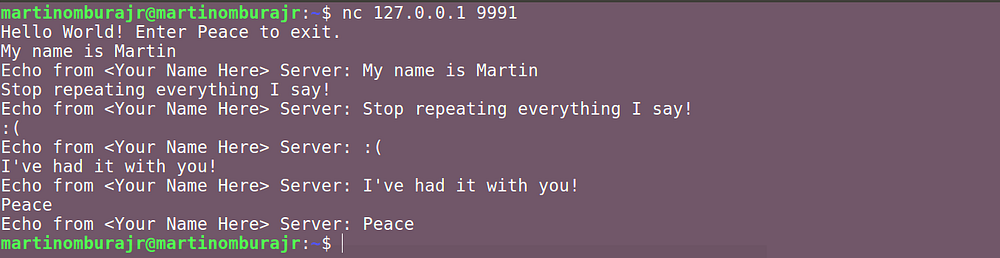
5.2 Once Connected
Once connected! You should have something that looks like this. 4

Feel free to play around and type stuff to it,

Close the connection by typing “peace”
As you play with it, try restarting the connection, adding more connections etc. You will notice these important points: 1. This server can only handle a single connection, so multiple connections to it will be voided. In a future article we shall make this server concurrent, allowing it to handle multiple connections. 2. If the client i.e you, terminate the connection, the socket closes, the connection breaks, and the program ends, meaning you cannot connect to the server again without restarting the application.
Conclusion
The purpose of this article was to play around with some of the cool network features employed by Java! As you can see the possibilities are endless. We could have coded our Server in a way that perhaps performs mathematical calculations based on the input data we provide, or our server could be the intermediary between a database, and it would perform actions like retrieving, verifying, manipulating or sanitizing database information based on input. The opportunities are endless!
|


Comments
Post a Comment